DC power jack repair guide. Do-it-yourself instructions.
This guide will explain how to repair a failed or loose DC power jack on a laptop computer yourself. Here’s my previous post related to DC power jack related issues.
Disclaimer: I’ve made these instructions only for people experienced with soldering and repairing computers. If you don’t feel comfortable doing this job, please do not open the laptop or you can permanently damage your computer. Take your laptop to a professional repair shop instead.
Use this repair guide at your own risk. ![]()
First of all, you’ll have to disassemble your laptop and remove the motherboard. Here you’ll find disassembly instructions for some major laptop brands such as IBM, Dell, HP, Compaq, Toshiba. If your laptop is not on the list, you’ll have to figure out yourself how to take it apart.
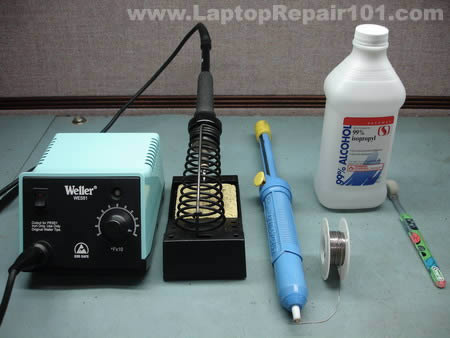
For this repair you’ll need the following tools.
1. Soldering iron or soldering station. I use Weller WES51 soldering station and for this job I set temperature to about 800-850°F.
2. I use high-tech rosin core silver-bearing solder from Radioshack with diameter 0.022″ ( Catalog #: 64-013 ). I think standard rosin core solder will work just fine.
3. Desoldering pump for removing solder around component leads. I use Edsyn Soldapullt pump, model DS 017.
4. 99% isopropyl alcohol and tooth brash for cleaning the motherboard from flux.
5. If you need a new DC power jack, you can find a cheap one here.
Laptop DC power jack repair guide.
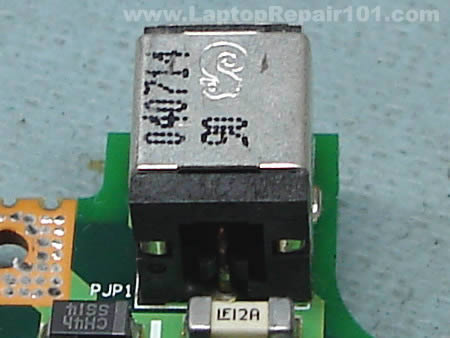
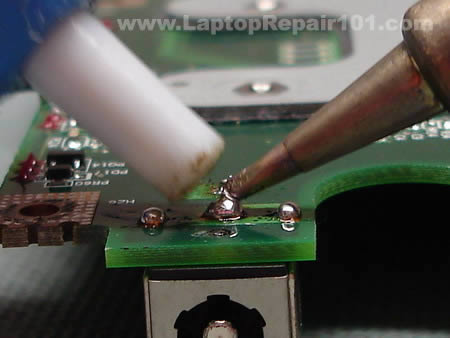
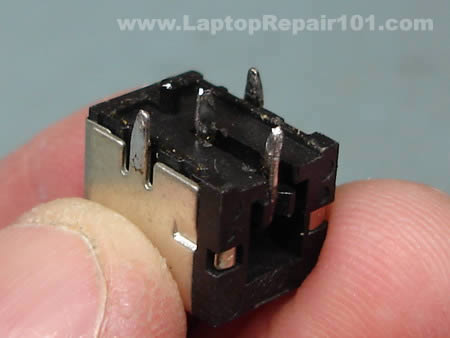
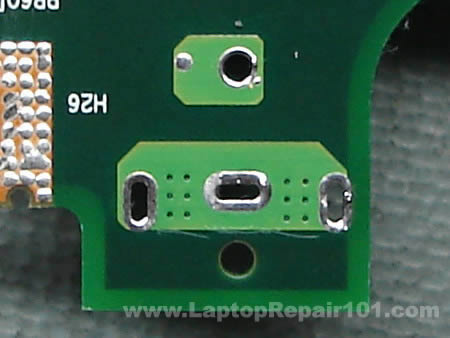
As you see on the following picture, the solder drop on the positive terminal looks different than on other three contacts. That’s where the problem is. The positive pin is not making a good contact with the motherboard and because of that power to the laptop cuts off when I move the power plug inside the power jack.
I’m going to desolder the power jack from the motherboard, clean contacts on both power jack and motherboard and then solder it back in place - this is the proper way fixing the power problem.
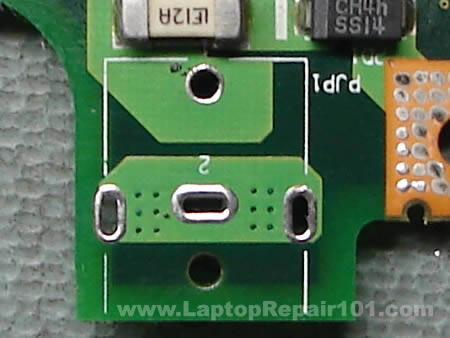
Start desoldering process with adding some new fresh solder to all three contacts. This will make old solder more flowable, easier to remove.
While heating one of the contacts, remove the solder from this contact using the desoldering pump. Repeat the same steps with all power jack contacts until you remove as much solder as possible.
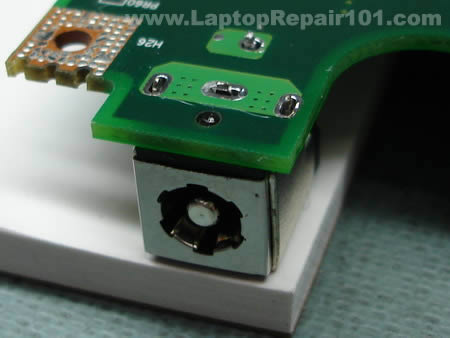
Grab the power jack and carefully try removing it from the motherboard. Most likely you will not be able to remove the power jack the first time because there will be some solder bridges left between the contacts and traces on the motherboard. Carefully wiggle the power jack without applying any significant force and at the same time heat up all contacts one by one. This will help you to remove the power jack.
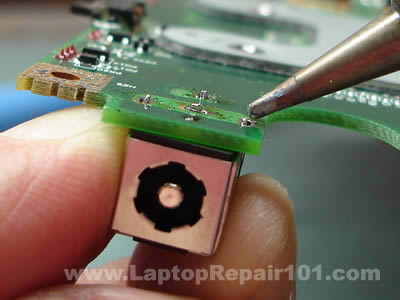
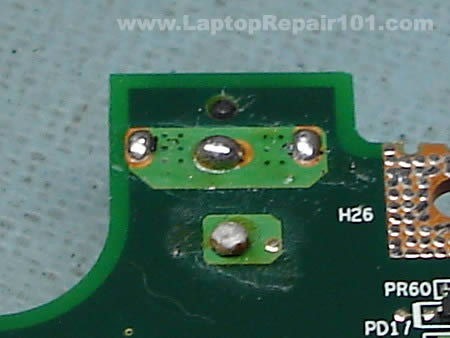
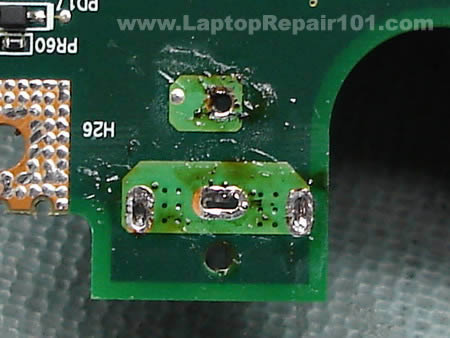
The DC power jack is almost removed from the motherboard.
Be careful. Inside the positive hole there is a sleeve witch connects the terminal on one side of the motherboard with the traces on the other side. If you are removing the power jack with force, you can pull the sleeve from the hole. You don’t want to do that. So, do not apply any force and make sure the solder is melted when you are removing the power jack. I hope you understand what I’m talking about.
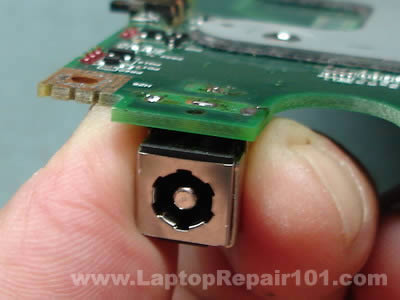
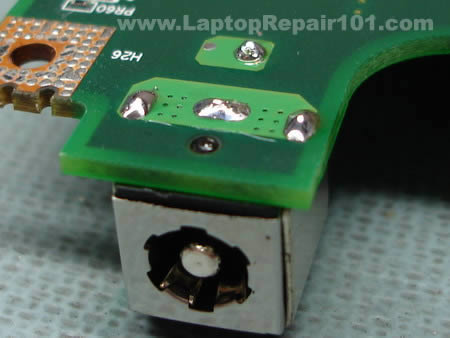
After the power jack is removed, clean all oxidized contacts with a knife.
Apply a fresh coat of solder to all contacts on the power jack.
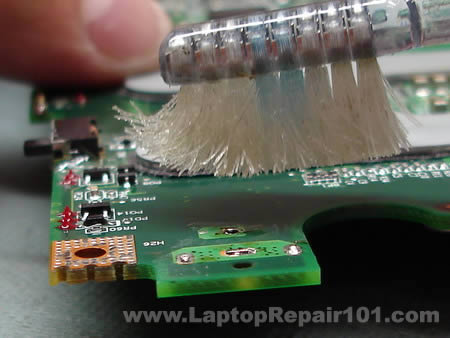
The power jack terminals will look dirty because of melted flux.
You can remove the flux using the tooth brash and alcohol. It’s not necessary but it will make your job looking clean.
Apply a fresh coat of solder to all power jack terminals on both sides of the motherboard.
This side has been coated.
And this side has been coated too.
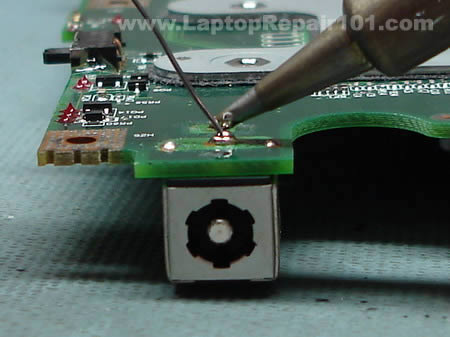
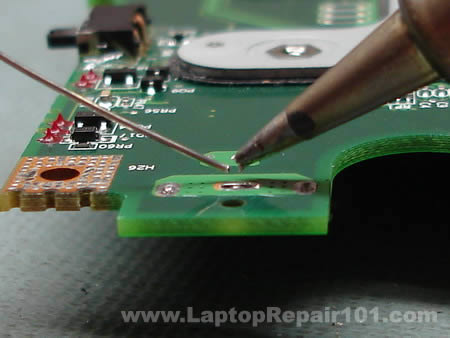
Now you can install the power jack back on the motherboard. Put something under power jack so there is no gap between the jack and the motherboard. Now you are ready to solder the jack back in place.
Solder all power jack pins.

The job is done and the laptop DC power jack is fixed. B-E-A-utiful!
Now just install the motherboard back into the laptop and you are done.
18 comments December 6th, 2007
Removing and replacing laptop keyboard
These instructions will help you to remove and replace keyboards on various laptops. I will not be able to cover all models but you’ll get the idea. Steps for removing and replacing the keyboard are similar for most laptops.
Warning!
- if your laptop is still covered by the manufacturer’s warranty, do not open the case or you can loose the warranty
- always remove the battery and unplug the AC adapter before you open the laptop case
- if you damage the keyboard connector on the motherboard you’ll have to replace the whole motherboard
- proceed on your own risk
Sony laptop
I took these pictures from a Sony Vaio PCG-K33 (model PCG-9S1L) notebook. Should be similar for some other Sony notebooks too.
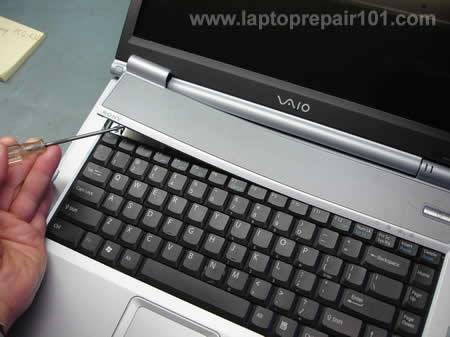
Insert a small flathead screwdriver under the keyboard bezel and carefully lift it up. Continue releasing plastic latches and removing the keyboard bezel with your fingers.
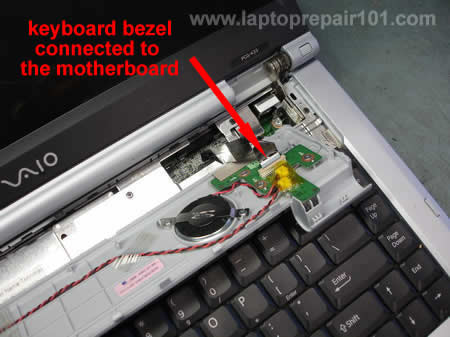
Be careful, on some models the bezel might be connected to the motherboard as it shown on the picture above. If you accidentally pulled the cable, connect it back. It is not necessary to disconnect the keyboard bezel from the motherboard in order to remove and replace the keyboard, just put it aside so you can access the keyboard screws.
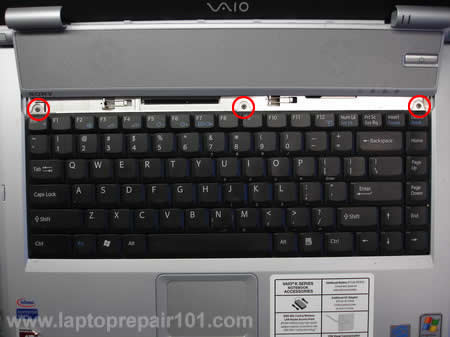
Remove three (or more) screws from the top of the keyboard. Carefully lift up the keyboard from the laptop case.
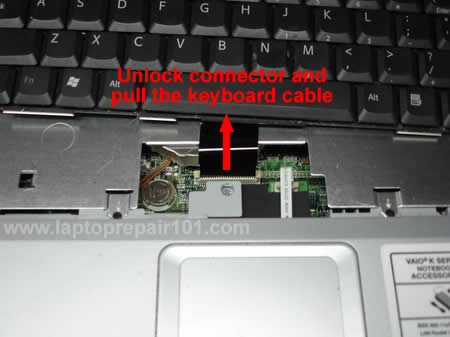
The keyboard connects to the motherboard via a flat ribbon cable. Before you pull the cable from the connector, you’ll have to unlock the connector.
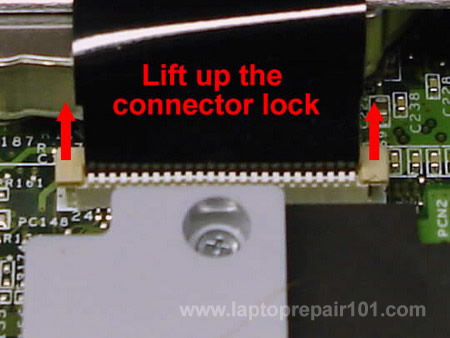
The image above illustrates how to unlock the keyboard connector. Carefully move the connector lock 2-3 millimeters up and after that pull the keyboard cable. To install the keyboard, follow the above mentioned steps in the reverse order.
Toshiba laptop
The following pictures were taken from a Toshiba Satellite A135 laptop. The keyboard removal instructions will be almost the same for most modern Toshiba laptops.
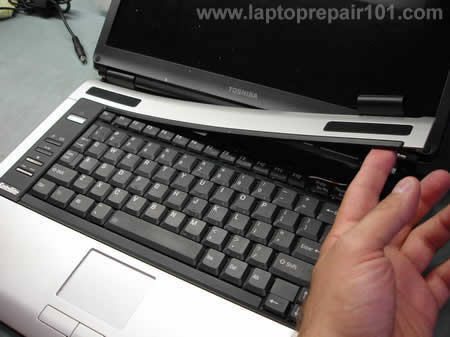
The keyboard bezel removal procedure is similar to the above mentioned Sony Vaio laptop. Lift it up with a small screwdriver and remove using fingers. On most Toshiba laptops the keyboard bezel doesn’t have any circuit board underneath, it’s just a piece of plastic and you don’t have to worry about cables.
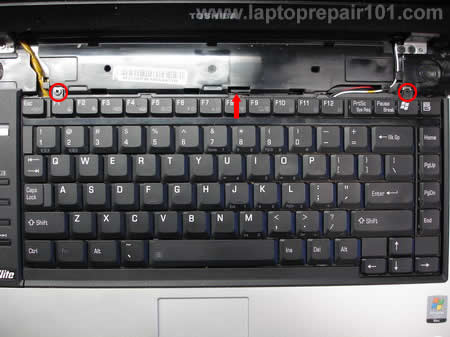
After the bezel is removed you get an access to the keyboard screws. Remove two (or more) screws. Release the plastic latch pointed with the red arrow and lift up the keyboard. Carefully put the keyboard aside so you can access the connector underneath the keyboard. Do not forget that the keyboard is still connected to the motherboard.
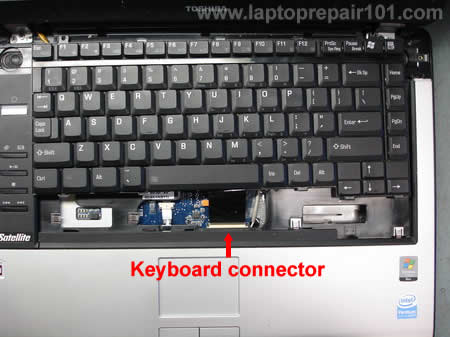
Before you remove the keyboard, you’ll have to open the connector and release the flat ribbon cable.

Here’s a closeup picture of the keyboard connector on the motherboard. Be careful, this type of connector is fragile. On the left image the connector is closed. On the right image the connector is opened. Unlock the connector by moving the lock up as it shown on the right image and after that release the ribbon cable. Remove and replace the keyboard. For assembly instructions follow all the steps in the reverse order.
If you are looking for laptop disassembly instructions, check out laptop service manuals.
19 comments August 30th, 2007
Laptop does not start. Fixing the problem.
If your laptop does not start at all or it starts but will not boot properly, it’s possible that you can fix the laptop at home without taking it to a repair center. Here are some troubleshooting tips for you. I’m not sure if I can cover all situation at once, so I will update this post as more examples come into my mind.
Situation 1.
The laptop appears to be dead. You plug the AC adapter but the LEDs (power light, hard drive light, battery charge light, etc…) do not light up and the laptop will not react at all if you press on the power button.
First of all in this situation check the AC adapter. You can test the output voltage with a voltmeter. If you cannot do that, find a known good AC adapter and use it for testing the laptop. It is possible the laptop appears to be dead because the AC adapter is bad (and the battery is discharged). If you know that the AC adapter is working properly and it outputs correct voltage but the laptop is still dead, most likely you have a power issue on the motherboard (or power board on some laptops) and it has to be replaced.
If you have to replace the AC adapter, make sure you use a correct one. The output voltage must be exactly the same as on the original adapter. The output amperage has to be the same as on the original adapter or higher, but not lower.
Situation 2.
When you plug the AC adapter the power LED and the battery charge LED light up. When you press on the power button the laptop will not start and you cannot hear any activity from the hard drive, cooling fan and the DVD drive.
If the power LED lights up it indicates that the laptop is getting power from the AC adapter. Most likely there is nothing wrong with the adapter but just in case test it with a voltmeter to make sure the output voltage is correct.
Also try this. Unplug the AC adapter, remove the battery and wait for 1-2 minutes. After that plug the AC adapter ans try starting the laptop again. Sometimes this trick helps.
It also could be a memory related problem. Try reseating the memory module, just remove it from the slot on the motherboard and install it back. Try installing the memory module into the other slot (if it’s available). If you have two memory modules installed, try removing them one by one and start the laptop just with one memory module installed.
If the laptop starts fine with one memory module in both slots, but will not start with the second memory module in both slots, the second memory module is faulty. Replace the module.
If the laptop starts fine with both memory modules when they are installed in the slot A, but will not start with both memory modules installed in the slot B, the slot B is faulty and you’ll have to replace the motherboard or use only one memory slot.
Situation 3.
When you press on the power button, the laptop makes a series or short and long beeps and will not start up. There is no video on the screen.
In this situation test the memory module as I described in the situation2. Try installing a known good memory module. Most likely you are getting a beep error because of a faulty memory.
Situation 4.
You start the laptop. It sounds like the laptop is booting normally (hard drive LED is flashing) but there is no video on the screen
In this situation test the laptop with an external monitor. If the external screen works fine but there is no video on the laptop LCD, most likely there is a problem inside the laptop display assembly. Go to my previous post witch covers laptop video problems in more details.
Situation 5.
You start the laptop and it starts making repetitive clicking noise or grinding noise.
Most likely you hear this noise because of a faulty hard drive. You can remove the hard drive and start the laptop without it. If the noise is gone, the hard drive is your problem. Replace it.
If the laptop makes clicking or grinding noises and you still have video on the screen, you can run a hard drive test utility. I usually use Hitachi’s drive fitness test. This test is reliable and easy to use.
Situation 6.
The laptop boots into Windows ans works for a while, but after that it shuts down by itself without any reason or warning. You restart the laptop but the same problem appears again
Most likely it’s a heat related issue. Listen for the cooling fan, make sure it works.
Also this problem might appear because of a faulty memory module, try some tips from the situation 2.
The laptop still boots ans you still can see the screen, so you can run the memory test. I usually use Memtest86+. Run the memory test and if it fails, replace the faulty module.
Situation 6
The laptop starts normally but video on the screen has lines, some strange characters or other defects
It could indicate a problem with the laptop LCD screen, video cable, graphics card or motherboard. Here’s my previous post witch covers troubleshooting bad images on the screen in more details.
86 comments May 23rd, 2007
Accessing notebook hard drive using USB enclosure
If for some reason your notebook fails to boot and you need to access data on the hard drive (I assume there is nothing wrong with the hard drive itself), you can use an external USB enclosure. This method is very simple and could be very useful when you need an emergency access to your data on the hard drive.
First of all you’ll have to buy an external USB enclosure for notebook hard drives. These enclosures are inexpensive and usually you can buy them in any local computer store. You also can find a wide variety of external enclosures on the Internet. Make sure to buy a correct one, enclosures for ATA and SATA hard drives are different (the connector inside the case will be different). Usually the enclosure includes the case and the USB cables.

Now remove the hard drive from the laptop. For this example I’m using an ATA hard drive.

Open up the enclosure case and connect the hard drive to the connector inside. After that insert the hard drive into the case.

After everything is assembled, you are ready to connect this device to any working computer (notebook or PC). The enclosure cable usually has two USB connectors on one end, make sure both of them are connected to the computer. You don’t need any external power supply for the enclosure because the hard drive gets power through USB ports. If the computer you are connecting the enclosure to runs Windows 2000 or higher, you will not need any device drivers. As soon as you connect the enclosure to the computer, the external hard drive should be detected and recognized automatically. After that the external hard drive will appear in My Computer and you can access it as any other hard drive in the computer.

If you are getting “Access denied” message when you are trying to access your files on the hard drive, you’ll have to take ownership of a file or folder.
My previous post explains how to connect a notebook hard drive to a desktop PC via IDE hard drive adapter.
26 comments April 17th, 2007
A key fell off the laptop keyboard. Fixing the problem.
One or more keys fell off the laptop keyboard and you are not sure how to put them back? Don’t worry, most likely you can fix the keyboard and it’s not necessary to buy a new one. There is no universal repair guide because all keyboards are different. Here’s what I usually do in this case.
Situation 1. The key cap and key retainer fell off the keyboard and you cannot figure out how to assemble them back.

Carefully remove the cap from any other working key so the key retainer stays connected to the keyboard.

Take a closer look at the key retainer, it’s connected to the keyboard at four different points.
Assemble the disconnected retainer the same way as one on the keyboard and put it back in place.
Put the key cap on the retainer and snap the cap back in place.
Situation 2. The key fell off the keyboard and you lost the cap or the retainer. In this case you can purchase a single key eBay, just search for it. (Search examples: “Dell keyboard key”, “Toshiba keyboard key”, “HP keyboard key”, etc… )
After you found a new key, put it back in place the same way as I described in the situation 1.
Update. Installing the space bar key.
The space bar key is connected to the keyboard a little bit differently then any other key.

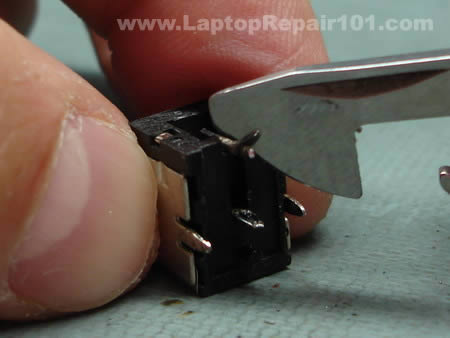
There is a metal retainer connected to the space bar key (on some keyboard models). Separate the retainer from the space bar key with a flathead screwdriver.

Install the retainer back in place as it shown on the picture. You have to engage the retainer with the small hooks on the keyboard.

Put the space bar key back in place and gently press on it with fingers until it snaps back in place.

That’s it. The space bar key is installed back in place and should work as before. If you still cannot fix your keyboard, then you’ll have to find a new one and replace it.
177 comments March 20th, 2007
Laptop has bad video on the LCD screen. What is wrong?
Here I’m going to post some laptop screen photos showing bad video output. I’ll explain what was wrong with the screen and how I fixed it. I plan to ad more examples as soon as I get new pictures. If you have your own example (and know how to fix it) please let me know and I’ll post it too.
Here’s some help for finding a correct part for your laptop.
Example 1.
Here’s a picture of Satellite M55 LCD screen I made this morning. I got this video output as soon as I started the laptop. There were a lot of vertical lines, and they were changing color without any pattern. To me it looked like Northern Lights (never seen in real life) :). The external monitor worked fine.

As soon as I applied some tension to the screen it changed the pattern. Some horizontal lines appeared in the middle of the LCD.

Here’s the difference. When I torque the screen, the image appears but it’s distorted with some horizontal lines running across the screen.
Reseating the video cable didn’t make any change and the problem was fixed after I replaced the LCD screen.
Example 2.
I took this picture from Toshiba Satellite M65. I think that this example is very typical. One day you wake up, turn on the laptop and see one or a few hair-like vertical lines in different colors.

When you move the LCD screen some lines might disappear or more lines appear on the screen. A video output on an external screen would be perfect, without any lines. Unfortunately, these lines indicate a screen problem. I’ve never seen this kind of video output caused by a bad video cable or bad FL inverter board. My laptop was fixed after I replaced the LCD screen.
Example 3.
The photo below comes from Toshiba Satellite 5205. The laptop displays identical vertical lines all over the LCD screen as soon as I turn it on. Sometimes these lines are red, sometimes they are blue, sometimes they become wider and change color to white.

The same pattern appears on the external monitor. It displays same vertical lines. When the same video defect appears on both monitors – internal LCD screen and external screen, then most likely it happens because of a bad video card. On some laptops the video card is integrated into the system board, on other models it’s a separate module.

In this example, the vertical lines were caused by a failed video memory on the system board. I’ve tested the video memory with Microscope utility and it failed the test. In Toshiba Satellite 5205 the video memory is integrated into the system board. To fix the problem, I’ll have to replace the board. (We do not have equipment to replace the memory module itself).
Example 4.
Here’s another example of a bad LCD screen. My bad! It wasn’t the LCD screen problem.
As soon as I turned on the laptop, I was getting these reddish marks on the LCD screen but not on the external monitor. Reseating and replacing the video cable didn’t help. The problem disappeared when I installed my test LCD screen. Yes, for some reason I wasn’t able to reproduce the problem on my test LCD screen. But the reddish video appeared again as soon as I replaced the screen. I guess it happened because the system board had some kind of intermittent problem with onboard video or video connector. Long story short, I had to replace the system board and it fixed the problem. Yep, I misdiagnosed this laptop.
Example 5.
Here’s one more example of a faulty LCD screen. The left half of the screen works just fine but the right side is completely white.

Example 6.
Here’s another laptop with a bad LCD screen. This time it’s a tablet PC.

Example 7.
This screen looks like the screen on the example 1. I hooked up an external monitor and the external video works perfectly fine.

Here’s the difference. When I torque the screen, the image appears but it’s distorted with some horizontal lines running across the screen.
After a few seconds the image washes away.

I had to replace the LCD screen.
Example 8.
This laptop displays inverted colors right from the startup. As you see, the Toshiba logo is light green instead of red. The background is light gray instead of black. The Intel logo should be blue on a white background but it is red on a black background.
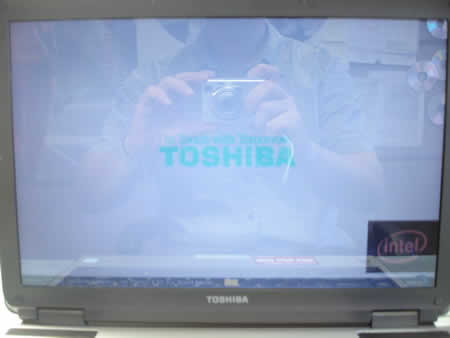
When your laptop displays inverted colors as on the picture above, this is an indication of a bad screen. You’ll have to replace the screen.
Example 9.
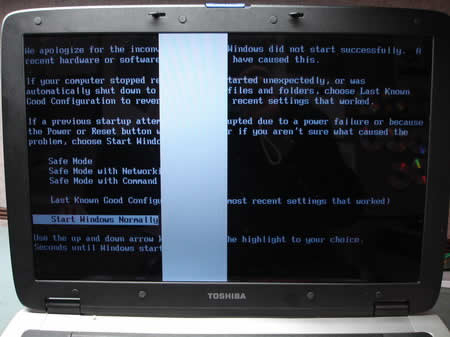
Here are two more screens. In both cases this problem is related to the LCD screen, witch means the screen has to be replaced.
On the image below you see a white band running from the top of the screen to the bottom. This band appears right from the laptop startup and runs through the logo too.
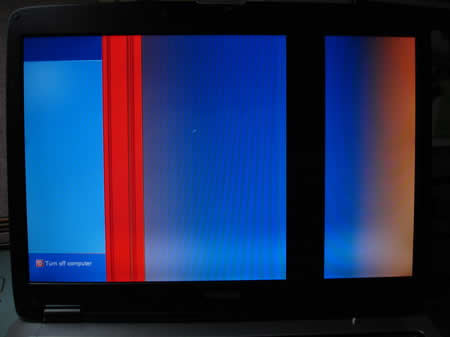
On the following image only the left side of the screen is working properly. This problem is caused by faulty LCD screen.
Here’s my other post related to troubleshooting laptop video problems:
How to troubleshoot and fix laptop video problems
Taking apart notebook LCD screen
312 comments August 17th, 2006
Notebook display assembly diagram. How an image appears on the screen.
Here is a simple diagram that will help you to understand how a notebook display assembly works and how an image appears on the screen. I’m not an artist and I tried my best drawing this diagram, so if you cannot see a laptop in this picture, don’t be mad. ![]()

A generic display assembly includes a very few parts and knowing them will help you to understand witch part can cause a problem if you laptop video not working properly.
Video cable. A video signal from the motherboard goes to the LCD screen through the video cable. The video cable connects to the motherboard (or video card) through the connector 1. The video cable connects to the LCD screen through the connector 2. The video cable (in most cases) is also responsible for supplying a necessary voltage for the FL inverter board. The video cable connects to the FL inverter board at the point 3.
FL inverter board. This board is responsible for converting low voltage DC power (point 3) to high voltage AC (point 4), necessary to light up the backlight bulb. If the FL inverter board is bad, the LCD screen (backlight bulb) will not light up when you turn on the laptop, but you still should be able to see a very dim image on the screen.
Looking for a new screen, video cable or inverter board? Find it on eBay.
CCFL (backlight bulb). When the backlight bulb lights up, you can see an images on the LCD screen. In most cases the backlight bulb is a part of the LCD screen and if it’s bad, the entire screen has to be replaced. By the way, some specialized repair shops can replace the backlight bulb itself.
Lid close switch. The lid close switch is a small button that locates close to the display hinges. On some newer models there is no button, because the switch is magnetic. You can set up your laptop to go to a hibernation mode or to a standby mode when the LCD is closed. It’s done through power management software. These modes are triggered when the display is closed and the lid close switch is pressed down. If the LCD screen on your laptop will not light up when you open the display assembly, check the lid close switch is stuck inside (it might happen because the switch is dirty).
Related articles:
Troubleshooting and fixing notebook video problems
How I took apart and repaired my notebook LCD screen with water damage - removing the LCD and taking it apart
Screen inverter replacement. Fixing laptop backlight problem. - replacing inverter board in an IBM ThinkPad laptop
Laptop has bad video on the screen. What is wrong?
183 comments July 8th, 2006
Toshiba Satellite A75 failed power jack workaround
Today I received an email from Tony Sakariya (tsakariyaATyahooDOTcom) who was experiencing a problem with the power jack on his Toshiba Satellite A75 laptop. He’s been able to fix the problem by relocating the power jack outside the laptop case away from the system board.
I would like to share with others a tip for repairing their Toshiba A75 laptop for the DC Jack and battery charge problem.
I have a Toshiba A75-S209 for a year now. After the first 3 months it developed the exact same problem. Battery would not charge and I had to twist and turn the power jack to make the connection. Since it was in warranty, I returned it and they repaired and sent it back to me. The problem recurred again after about 4 months and I sent it again and they repaired it and worked fine for 5 more months and it failed. This is a design flaw with Toshiba. Now that I am out of warranty, I decided to repair it myself. Your guide for dismantling A75 was awesome. Thanks for the info. Now here is what I want to share with others. Resoldering the power jack with a new one does solve the problem for a while but it will reoccur. Hence I decided to bring out a wire with the Jack outside. Of course it looks dirty but it is a permanent solution. I am attaching the photo of the repair I did. I got the DC jack from ebay and insulated it with a electrical insulation tape. Now it is working fine, I do the connection and disconnection on the dangling power jack outside the laptop and hence no chance of breaking the soldering outside.

• Coil the pair of wire one round through the ventilation grill before taking it out as shown in the picture above. This is to prevent any external shock or force being directly transmitted to the soldering joints.
• Now we need to connect a new DC Jack to other end of the wire. I purchased the new DC jack from ebay for a price of $6. Shown in the picture above the white wire is the positive terminal (+) and hence must connect to the inner ring of the DC Jack. Similarly the blue wire being the negative terminal (-) should connect to the outer ring of the DC jack. Refer the picture below on how the wires are soldered to the DC Jack. Be careful not to short the leads as they are very close.

• Now neatly wind a round of insulation tape over the wire and especially on the exposed DC Jack exterior. This will prevent any short-circuit and also give a better appearance.

Toshiba Satellite A70/A75. Disassembly guide with pictures.
Valued Comments.
Submitted by Binney:
The workaround relocates the jack externally. When I did this, a short occurred between the metal casing on the top cover (the one removed with the guitar pick). This happens if the solder repair is too tall. I covered my repair with electrical insulation tape and that fixed the problem. It took me quite some time to figure out where the short was and would like to save others the headache.
280 comments May 27th, 2006
CD-ROM drive disappeared and I cannot see it in My Computer window. What can I do?
One day you turn on your computer and cannot see the CD-ROM or the DVD-ROM drive in the My Computer window anymore. This problem is very common for laptop and notebook computers and might be caused by a failed drive or by corrupted software. You can try the following repair steps before you decide that your drive is bad.
- I found this solution on Microsoft website and it helped me many times to fix the problem with a missing DVD/CD-ROM drive. I always try to replace the existing driver first and if it doesn’t fix the problem I go with removing the registry entry. Method 1 worked very well for me.
- If the above mentioned methods didn’t work for you, you can try to reseat the optical drive. Overtime the CD-ROM drive connector might get oxidized and a simple drive reseating can fix the problem. Try to remove the drive from the laptop and put it back. See if it will fix the problem.
- You can also try to boot from any bootable CD to see if you laptop recognize the CD-ROM drive on BIOS level. Put any bootable CD (Live Linux CD, Windows XP CD, Windows 2000 CD, etc) into the CD-ROM drive and change the boot order to start from the CD-ROM drive. If you laptop starts to boot from the CD, then the drive is recognized in BIOS and most likely it operates properly. In this case look for a software problem. It might be necessary to reload the operating system to fix the software problem. If you cannot boot your laptop from a bootalbe CD, then the drive might be bad itself.
19 comments March 24th, 2006
How to troubleshoot and fix laptop video problems
Here are some tips and tricks for troubleshooting and fixing laptop video problems. Video issues are very common within portable computers and with the following tips you should be able to detect and eliminate basic laptop video problems.
Laptop LCD screen has a faint image.
Look at the LCD screen very closely and check if you can see a faint image on the screen. It’s possible that the LCD lid close switch stuck in the “closed” position and the backlight stays off even when you open the LCD screen or turn on the laptop. The switch turns off the backlight when you close the LCD display to save the laptop battery power. Check the LCD lid close switch. Usually it is a small plastic pin located close to the LCD hinges. Try to tap on the switch a few times to turn on the backlight. If after tapping on the LCD lid close switch the backlight stays on, you fixed the problem.
It is also possible that after tapping on the LCD lid close switch the backlight works fine, you see a normal video on the screen for some time and then the backlight turns itself off again. In this case I would blame the FL inverter board. Try to reseat cables on both end of the FL inverter to make a better contact between the cables and the FL inverter board. If it doesn’t help I would try to replace the FL inverter board.
Laptop LCD screen is solid white color.
Most likely it is just a bad connection between the LCD display and the system board. I would try reseating the video cable connector on the back of the LCD screen first and check if it fixes the problem. After that I would try reseating the video cable connector on the system board. I would also try reseating cables if there is no video on the LCD screen at all.
The video on the LCD screen is garbaged.
Try to connect the LCD screen to an external monitor. If the external video is fine, you have a problem with the LCD screen or the LCD video cable. You can try to fix the problem by reseating the video cable on the back of the LCD and on the system board.
If you see the same garbaged video output on the external monitor most likely it is not the LCD screen problem. In this case the system board (with onboard video) is bad or the video card is bad.
I understand that these tips will not cover all video problems with portable computers. If you have a different problem, you are welcome to leave a comment and I will try to help you if I can. ![]()
Here’s a notebook display assembly diagram and tips for finding spare notebook parts.
Read more:
How I took apart and repaired my notebook LCD screen with water damage
Screen inverter replacement. Fixing laptop backlight problem


1 komentar:
Nice blog and nice information which shared by the blog owner I want to say thanks to this blog owner. I would like to come again on this blog. Liquid Soldering Flux, Aluminium Soldering Flux
Posting Komentar